Gym Myths and Misconceptions: The Dancer Edition

For as long as I can remember, I have been confused about why dancers aren’t considered athletes. Almost everyone I have ever spoken to about this concedes that dance is an athletic art form and requires athleticism, yet says that considering dance a sport is a step beyond the truth. It wasn’t until college that someone spoke to me about it in a way that made sense. They said, 

“Dancers are athletes, but as soon as we call dance a sport we impose upon it a set of standards that imply competition. Of course, competition dance exists, but that isn’t (largely) why audiences go to see dance. They go to see dance for its artistry which reveals truth, beauty, and empathy to an audience.”

While I do agree that professional dancers aren’t simply athletes but also artists, I think that thinking of dancers only as artists or  (in the case of a choreographer) tools for an artist has done a lot of harm when it comes to a dancers idea of cross training, fitness. It’s placed in our lives as athletic artists. When you don’t consider someone an athlete first, you don’t train them like athletes, teaching them about nutrition and gym time. This leads to loads of dancers entering into the professional world without a clue as to how to stay physically prepared to perform despite no longer having a rigorous class or studio schedule keeping them ready. It leads to many a Google search about cross-training for dancers, how long dancers should work out, should dancers lift weights, how to train without getting “bulky,” and so much more. So, let’s dive into some of the gym myths and misconceptions that are holding you back from making progress.
  Working out Vs. Training Blog

1. Cross-training should look like a dance.

The first of the gym myths that needs busting is probably one of the most persistent offenders. It’s the idea that your cross-training should look like dance. These are your bosu-ball “stability” exercises. They are your “dancer supersets.” These are the workouts that are contributing to your overuse injuries, and these are the workouts that are keeping you lopsided in your training.

According to Healthline.com, the best definition of cross-training is:

an exercise protocol that utilizes several modes of training that are outside the athlete’s main sport to develop a specific component of fitness.”

This means that, by definition, cross-training cannot be the same as your “sport.” So, a good rule of thumb: if it looks like dance and feels like a dance, it probably is dance – I’m looking at your weighted téndus and sautés! So what does cross-training look like for dancers? The main thing is making sure that you are spending time strengthening muscle groups and stabilizers that often are weaker in dancers. For example, the glutes are largely underdeveloped for dancers. So, adding in some deadlifts, squats, and lunges would be a great way to cross-train that muscle group. Another thing to consider is the positioning of your body. While yes, there are types of squats performed in turn out, we as dancers spend a lot of time there. So, working in parallel could be a better use of our cross-training sessions. 

2. Longer is better.

Another major gym myth people (not just dancers) believe is that longer is better. This is completely untrue and leads to people filling their workouts with “junk” to increase the volume of their sessions. The reality is, in fitness, as in life, quality is better than quantity.  A longer workout does not equal more work. A workout only needs about five to eight quality movements to train your target muscles for that day effectively. Using a compound movement at the start of your workout (which targets more than one muscle group) and finishing off with a few targeted isolation movements can get you in and out of the gym in less than an hour.

Want a few examples of these? Check out @dancerswholit on Instagram and tiktok for tons of free workouts and training tips!

3. Workouts are punishment for eating.

Of all the gym myths this is the one that has been passed down by our culture generation after generation. It’s perspective that your workouts are punishment for eating something that’s  “bad for you” or “being lazy” by taking a day off. The worst part about this is that it implies that workouts are not something that should be enjoyed. Yes, indeed, every workout isn’t “fun.” But they certainly can and should be enjoyed as much as possible! Beyond that, when we go to the gym to “work off” whatever we eat, it reinforces the idea that there are good foods and bad foods. This ultimately damages our relationship with food, which, as we know, often leads us farther away from our goals. For more information on this, check out our blog, “Thinking of Food as Good vs. Bad.” As your trainers, we want you to think of your workout as an opportunity to get closer to your goals and dreams. Thinking of your workout as a tool to get you closer to what you want motivates you to remain consistent. And with consistency comes progress, and with progress comes confidence. So let’s throw away this idea of the gym as punishment and start thinking of time in the gym as a catalyst. 

4. You should only lift light weights to stay lean.

This is the last of the gym myths we are busting today and, honestly, I can’t believe it still exists-but, alas, here we are. It’s the trope that you should only lift light weights so that you stay “long and lean.” First of all, what is long and lean, and why is it better? Well, long and lean look different on everyone, so that can’t be defined. And the short answer to the latter? It isn’t better. There are so many types of dance, and these different types of dance require different levels of mobility, strength, and agility. A tapper will train differently than a break dancer, who will train differently than a ballerina. There is no “one size fits all” training style for dancers. Furthermore, it can be confusing to define “lightweight” as “light” completely, depending on how strong a person is. Finally, this mindset negates the amount of work it takes to look bulky. Say it with me,

“Weightlifting is not the same as bodybuilding.”

Bodybuilders spend copious amounts of time and focus on building enough muscle to look the way they do. To fear being bulky from lifting weights in a cross-training program is similar to non-dancers thinking they can audition for ABT after a year of ballet classes at Steps on Broadway. So let’s let go of this archaic way of thinking about weightlifting for dancers. I can tell you from my own experience that after I started lifting weights, multiple pirouettes came easier, my jumps (which were already solid) got even higher, and my landings felt more controlled. No question, lifting weights took me to the next level in my dance training.

So, how many of these gym myths had you previously believed? There are so many benefits cross-training, and specifically weight training, can offer dancers. Dancers Who Lift exists because we have seen firsthand how effective it can be in helping dancers reach their goals. We’d love to welcome you into our community and answer any questions you may have.


Have questions? Shoot us an email at info@dancerswholift.com or send us a DM on Instagram.

We love helping people find the answers to their fitness and dance questions. But even if you choose to take this journey alone, know that we are right here, cheering you on!


Dance Audition

Dear Diary, A Week Of Auditions

Last week was wild.

It started with a self-tape audition request for RENT that was due by noon.

Then, that afternoon, I headed straight into a three-hour pre-production session with the choreographer that I assist, followed immediately by an acting class in Manhattan.

Tuesday was lighter, just a three-hour pre-production session. But Wednesday was full: two and a half hours of pre-production, followed by a dance audition for Tuacahn’s summer season.

That’s about when I decided I’d better do an Epsom soak if I were going to make it to the end of the week.

Honestly, that bath was clutch. 

Thursday, things really went off the rails.

I woke up early, got pretty, and headed into Pearl Studios 519.

Honestly, I only planned on one dance audition that day; it was for Frozen, and at first, I was stressed.

The dance audition was at 11:30, and, despite packing my morning with protein, I didn’t plan the timing of my breakfast well.

I walked into the room and felt my stomach growl.

“Great, just what I need.”

After a few rounds of definitely not getting it, I finally stopped, took a deep breath, and thought,

“Jordan, this is VERY in your wheelhouse. Focus up. You’ll be angry if you don’t.”

So I took a deep breath and focused on the parts that were tripping me up…and guess what? I did it! In fact, I nailed it.

After I sang for them, I decided to walk across the street to see what was happening at  the Moulin Rouge dance audition.

Miraculously a person had canceled, and they had one singular appointment time for me at 3:20. I snagged it.

While I was waiting, I realized Flat Rock Theatre was having its singers ECC. I decided to drop off my headshot with a note for the team, but when I got there, the holding room was empty, and I walked directly into the audition room instead.

I KNOW– as I said, it was WILD. And finally, I finished out on Friday with a day of filming all of the pre-pro work we’d been doing. Then, like a blur, it was over.

I could rest for a couple of days. 

What’s crazy is, despite it being one of my busiest weeks this year, I wasn’t tired. I mean, obviously, my body needed rest, but I wasn’t tired.  I realized that everything I did that week aligned with how I wanted to spend my time. You know that song from Tick Tick Boom!?

“Hey, what a way to spend a day…”

That’s how I felt each night as I slid into my Epsom bath. I spent my days doing things that filled me up; dancing, singing, and performing (Yes, auditioning IS performing). And I know it was a privilege to have a week where I made my money doing pre-production work instead of passing hors d’oeuvres. But what would my life look like if I made more time for these things that filled me up and stopped hustling so hard to balance four side jobs, dance classes, a training program, acting classes, voice lessons, and auditions?

Is that even financially sustainable? The truth is, I’m not sure. I’ve always thought the “jump and a net will appear” quote was for people with backup parachutes. But if I can be that busy and feel so full at the same time, why not give it a try? Or, maybe a better question is:

“How can I add in more things that fill me up and still make sure I am being financially wise?” 

Maybe that’s a question for another day.

For now, I will take it one step at a time and enjoy the feeling of being exhausted from doing things that bring me joy.  

Perfect push-up form

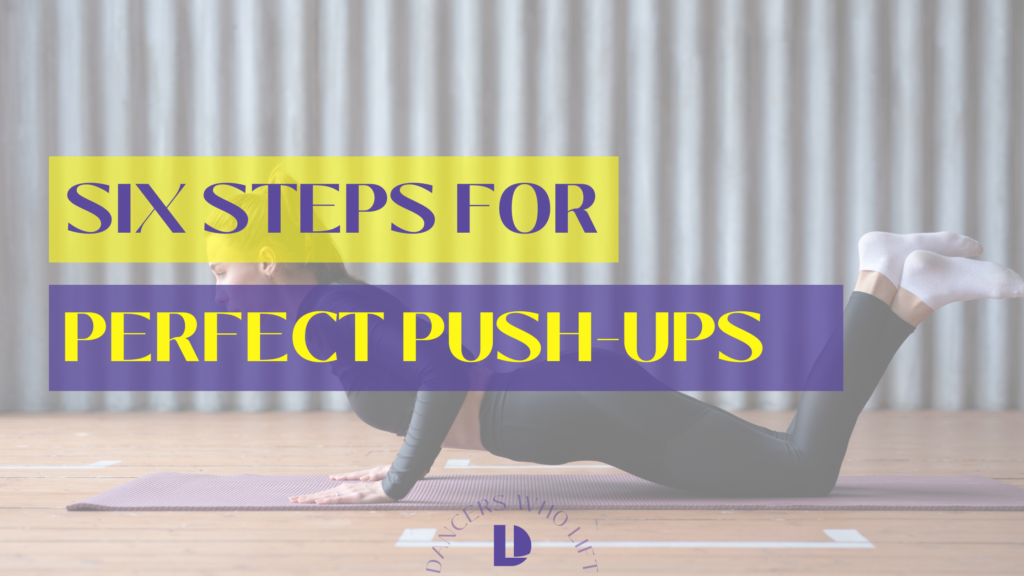
Six Steps for Perfect Push-ups!

Push-ups are an exercise everyone expects you to know how to do. From the PE classroom to dance class it’s a movement that we are expected to know how to do despite never being taught. Because of this, push-ups can be incredibly frustrating and beyond challenging. But with a little guidance on form and by following these six progressional movements, you’ll be crushing perfect push-ups like Gaston and Popeye before you know it. 
Form: 

There are tons of variations of push-ups out there.

From diamond hands to wide set-ups to yoga push-ups, the variations are endless and can make learning how to do a standard push-up confusing.

For our progressions, we are going to use a standard setup. To start, get on all fours.

Now, place your hands directly underneath your shoulders.

As you step your feet back into your plank position, allow your feet to be about hip-width apart instead of toe to toe.

A wider base will offer you more stability and will give you an easier starting point for your push-ups.

To accomplish push-ups from your knees, simply lower your knees from this position.

Check-in with your upper body; make sure your upper back isn’t sinking into your shoulders but that you are pushing up out of the floor.

Now, imagine that you have a ballet shoe elastic connected between the top of your hip bone and your bottom rib.

Adding this bit of core engagement will ensure that your lower back doesn’t sway!

Finally, when you lower your body in your push-up, do not hug your elbows to your side as you might in a yoga push-up.

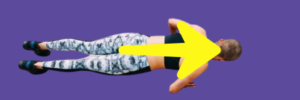
Instead, allow your elbows to work at a 45-degree angle to your shoulders.

If you were to look at your body from an aerial view, your upper body would create an arrow pointing in the direction you are facing.

Perfect push-up form- aerial view

STEP 1: Lowering Push-up From Your Knees

Start on your knees and create a straight line from your head to your knees. Lower yourself as far down as you can with control, and once you can’t go any lower, just reset! No need to push back up yet!

STEP 2: Full Push-up From Your Knees

From the same position on your knees, go for a full-push up.  Aim to get your chest all the way to the ground then push the floor away from you to push back up.

STEP 3: Lowering Incline Push-up

Find a ledge, chair or bench that you can use to place your hands on in a push-up position. Be sure to keep your core engaged like you are doing a plank and then lower down as far as you can with control. When you cannot go any farther, reset back to the starting position.

*HELPFUL HINT: The higher the incline surface the less challenging, the lower the incline surface the more challenging.

STEP 4: Full Incline Push-up

Using another surface to create an incline, perform a full push-up. This time, aim to get your chest all the way to the surface before pushing back up!

STEP 5: Lowering Push-up

Okay, let’s up the ante. Set up in a push-up position on the ground with legs extended like you are doing a plank. Keeping the core actively engaged, lower as far down as you can with control and then return to the starting position.

STEP 6: FULL PUSH-UP

Time to go for it!! Set up in that high-plank position and then lower til your chest hits the floor and then press the floor away to push back up to the start!

Now you’re on your way!

Want to put your perfect push-up form to the test? Try some of these workouts and see which push-up modification works best for you in real time. 

Want us to check your form before you dive in? Send a form video to us at info@dancerswholift.com or tag us in your form video on Instagram or TikTok @dancerswholift! We’d love to be a part of your push-up journey. 

Besides, celebrating your progress is one of our favorite things! 

Dead Bug Exercises- Dancers Who Lift Blog

Dead Bug Exercises: Variations For A Stable Core

Dead Bug exercises are a Dancer’s Who Lift favorite.

This is because the isometric bracing of both the front and back of your body is essential for lifting heavy weights safely.

On top of that, Dead Bugs train you to move your arms and legs independently from the hip and shoulder joints while maintaining a stable core–sound familiar? That’s right; Dead Bugs will only increase your core stability for dancing! In fact, according to this study, Dead Bug exercises are more efficient at improving core strength, endurance, and flexibility than traditional crunches1

Dead Bug Form Example

So let’s get to it. First things first, lie on your back on the floor, or a mat if that’s more comfortable for you. Then gently bend your knees placing your feet about a foot from your glutes. Next you’re going to make sure that your entire spine is maintaining contact with the floor by firmly exhaling out into the front, back, and both sides of your body– and don’t forget to engage your pelvic floor! (This is called bracing and it’s the special sauce that makes this exercise so dynamic.) Stay here for a moment and make sure you can maintain this stability while breathing. 

Once you have this down, you can move on to level one of the dead bug: maintaining this neutral spine while lifting your shoulders off of the floor by reaching your arms straight up toward the ceiling. Maintain this lift in an isometric hold for three to five exhales. If you’re having trouble maintaining your spine, think of the cue “rib cage flat” or “ribs together.”

The next level is adding in the legs. Simply lift the feet off the ground one at a time and maintain an isometric hold with legs and arms in the air for three to five exhales. The most important thing about incorporating the legs into this exercise is making sure you maintain the hips and knees at ninety degrees–don’t let those knees pull into the chest. This will keep your lower abdominals engaged throughout the entirety of the exercise and keep your Psoas/hip flexors relaxed. 

Ready for the next variation? Great! While breathing through your isometric hold, extend one of your arms back so it’s parallel to your ear. Then return the neutral and do the other side. It’s helpful if you can connect your breath with this movement. Try and exhale as you reach your arm back. The exhale will support abdominal engagement as you extend your arm.  Got that down pretty solid? Okay, good. The next step is to keep your arms still as you extend one leg at a time. I think of it as if I’m pushing a block away from my body, then returning my knee back to that ninety-degree position. Alternate between legs, again maintaining your breath and your isometric hold. 

Now we’re going to work one side of your body at a time. So, for this one, take your right hand and – in your dead bug position – press it against your right knee as your knee presses against your hand. This will activate your obliques. Now slowly extend your left arm and leg simultaneously as you maintain this isometric hold on the right. Return to neutral and switch sides. Do this for as many reps as your workout requires. I know, it’s killer…must be what killed that bug! (Kidding!)

Finally, we make it to our last variation. This time begin in your dead bug position with both arms and legs lifted. Now, slowly extend the opposite arm and leg while maintaining your neutral spine. Return to neutral and repeat on the other side. Do this for six to ten reps or as many as your training requires. 

My favorite thing about dead bugs is that once you’ve mastered the basic dead bug position and incorporated the breathing, moving up the ladder doesn’t necessarily mean that the exercises are “getting harder.“ Each variation has its own challenges and its own purpose in terms of engagement and stability. I recommend using a variety of the dead bug progressions throughout your training.


Which variation is your favorite? Let us know at info@dancerswholift.com! We’d love to hear from you, and it’s a great way to get in touch with us if you have any questions.

Overcoming Plateaus and Setbacks


Overcoming plateaus and setbacks on your fitness journey can be challenging. Whether you’re experiencing bad workouts, struggling with an injury, or trying to decide if you’re too sick to work out, staying consistent despite the setbacks takes determination. It also takes practice recognizing what is a plateau and what is just part of the ebb and flow of serious training. 

Lucky for you, we know you’re determined. So we broke down exactly how you can start overcoming plateaus and start seeing results again. 

Let’s get into it. 

Bad Workouts

Having a bad workout is part of the deal with taking training seriously and being an athlete. The longer you train, the more frequent those mediocre and bad sessions become. “Bad” can be defined in various ways but for the sake of this modification, we are going to use it to describe drastically decreased biofeedback markers like strength, energy, preparation, focus, mind-muscle connection, etc. Once it is determined that a modification needs to be made based on poor biofeedback, we recommend attempting to isolate the variable that is the greatest contributor and reducing the demand for it within the session. This should be an absolute last resort. Exhaust all other resources and efforts before having to modify based on a bad workout. This is NOT an excuse to leave the gym out of frustration. Remember, overcoming plateaus requires you to value determination over motivation. 

Example 1: You only had 3 hours of sleep the previous night and little food before your session, so your energy is very low. You attempt to work around this by acutely (single session) reducing the set volume to ensure the work you are able to do is as productive as possible.

Example 2: You are in a caloric deficit and just had a large macro drop so your strength is taking a hit. You attempt to work around this by acutely (single session) reducing the relative load you are using, so that we can more easily get the prescribed volume in without exceeding the prescribed proximity to failure.

Injury

Injuries are a frustrating occurrence – especially when you are working on overcoming plateaus. But acute injuries, such as muscle strains, are less likely than you might think, and catastrophic weight room injuries are very rare. You can avoid the vast majority of injuries, aches, and pains by lifting with good technique and adhering to a planned progression of effort and load. If you do sustain an injury, or flare up an old one, is important to note two things:

  1. Muscles heal relatively quickly, and you will regain all of your old size / strength (and then some) as soon as you get back to training at full capacity.
  2. Injuries will rarely require you to filly stop training. Training through an injury is reckless, but there is almost always a way to train around it. You may even be able to perform the same movement that you, albeit a modified load, tempo, and range of motion 

Sickness

No matter how proactive we are, eventually we all succumb to some illness, virus, or “bug.” Severity and infectiousness will dictate your ability to train, but it is almost always better to stay home until you have recovered instead of trying to train through it and potentially make yourself sicker and / or infect others. 

Symptoms that should deter you from training:

  • Vomiting
  • Severe muscle spasms
  • Diarrhea
  • Severe migraines
  • Body aches / chills
  • Fever

Symptoms that can be trained through in moderation:

  • Headache
  • Congestion
  • Sinus issues due to allergies 

Consistently Poor Biofeedback

If you have multiple poor performance in a row, say a whole week or two of workouts where you feel fatigued or overly sore, then something probably needs to be changed. You may need a week or two of lighter training (refer to Deloading) or reduce your workload so you can recover better. One bad workout is not a cause for concern, especially when one of the usual suspects is acute poor sleep, missed meals, or an especially stressful day. As we have emphasized, improving your physique and performance is a long-term process, and any one session means little in comparison to months of consistency and hard work. 

Missing Workouts

Just as one bad workout means little in the grand scheme of things, missing one workout will not set you back. If it happens, be transparent with your coach, if you have one! They may keep the rest of the week’s workouts exactly the same, or they may adjust the schedule so you can still in some of the important work from the day you missed. If missing workouts becomes a common occurrence, it would then be necessary to make a change. Fewer weekly workouts, completed consistently, will always beat a sporadic schedule. Your coach will be designing your program with a specific progression (refer to Progression Models), so if you see your schedule becoming more unpredictable, just let them know and make adjustments. 

Stalled Progress (it’s not a plateau!)

What people often think of as “plateaus” are more often the result of unmet expectations of rapid progress. There may be times when your performance or physical appearance seems to change rapidly, but by and large, gaining strength is a long-term process. Growing new muscle tissue is even slower. Fat loss can happen relatively quickly, but even then, the scale and mirror may not always reflect that progress on a daily basis. If you feel that your progress has stalled for a few weeks, let your coach know! They may be able to point out plenty of areas where you have made progress; but if need be, they can also make necessary adjustments to your training program or diet.


Eight Ways to Promote Faster Recovery


As professional dancers, we know how important it is to be ready at any moment. That’s why we continue to take classes, lift weights, and focus on maintaining healthy nutritional habits. That’s also why we need to promote faster recovery of our body, mind, and muscles. 

Being that active can easily lead to sore muscles– and nothing is worse than being surprised by a tight hamstring the morning of an audition. While planning out your workouts with your trainer can help prevent this, there are also a lot of things you can do on your own that can promote faster recovery between workouts and rehearsals.

I didn’t want you to miss out on any, so I created a tidy little list of eight things you can add to your routine to promote faster recovery. Let’s get started!

One: Eat Plenty Of Protein

I know I know, I know. It probably feels like you are ALWAYS hearing me talk about the importance of protein. And honestly? It’s because I am. Ensuring you have protein with every meal and after any workout or rehearsal helps muscles rebuild faster and will reduce soreness. This is because protein is made of amino acids. Amino acids act like building blocks for the body. So, eating protein after a workout or rehearsal gives your muscles the amino acids they need to rebuild after a tough session!

Two: Hydrate

Hydration may seem like a no-brainer. I mean, aren’t we a generation of people who carry emotional support water bottles and hydro-jugs? But you’d be surprised how often we are dehydrating ourselves as dancers. Outside of our coffees, teas, and occasional alcoholic beverages, we are expelling water from our systems every time we sweat. This means we must drink more water than the average person to meet our bodies’ fluid needs. Not only does staying hydrated promote healthy skin and prevent brain fog, but it also helps our bodies flush out excess lactic acid, promoting faster muscle recovery and resulting in less soreness. 

Three: Epsom Salt Bath

Warm baths with fancy salts and bubbles might seem like a luxury, but for athletes taking a soak has wonderful benefits for recovery and can be a great tool for relaxing muscles and promoting better sleep. While a warm bath of any kind will help release muscle tension, Epsom salts contain magnesium, an important mineral known for its anti-inflammatory properties. Magnesium also plays an important role in regulating melatonin production, which is the hormone that promotes sleep. Magnesium is said to promote relaxation of the parasympathetic nervous system, helping to relax your muscles, quiet your nervous system, and get better rest. If you love your weekly Epsom salt bath, you might even consider adding a magnesium supplement to your evening routine! (But always ask your trainer or doctor first!)

Four: SLEEP

It’s easy to joke about needing your “beauty sleep,” but getting at least 8 hours of sleep a night might be the most important recovery practice of all! Sleeping is the only time a body can truly recover and repair. You’d be surprised how much energy is used by our body to simply keep us awake! Additionally, sleep is the only time our body gets into a cycle known as “Non-REM Sleep,” “slow-wave,” or “deep sleep.” During this type of sleep, our blood pressure drops, and our breathing slows. Our brain experiences very little activity during this cycle, increasing the blood supply available for flowing to our muscles. This delivers extra oxygen and nutrients, which facilitates muscle healing and growth. As if that’s not enough, this cycle is also when our bodies release a growth hormone that promotes tissue growth and muscle repair.  Without 7-9 hours of sleep a night, our bodies experience a decline in growth hormone production resulting in a loss of muscle mass and reduced capacity for exercise.  

Five: Hobbies Away from Dancing

Let’s talk for a second about how important it is for our minds to get a break from Dance. Pursuing a career as a dancer is complicated because it feels equal parts job and equal parts dream. It’s very hard to differentiate between what we do and who we are when we feel so passionately about something. But the reality is, each of you is a whole person who is enough even when they aren’t dancing.

Hobbies can be complicated for artists because we learn something, and, in our industry, it is easy to start leveraging that thing for our careers. But having a hobby that you keep completely separate from your profession has huge benefits for you as a dancer and athlete! Working on something with zero pressure attached is a great way to reduce stress and give our brains time to recover mentally. I encourage you to try something new this week. Maybe you could learn to knit, pick up a coloring book, or remember how much you love to read!


Six: Long Walks

As you’ve already read, taking twenty to thirty-minute walks gets your blood pumping enough to get oxygen into your muscles, which promotes muscle recovery. Not only that, it’s one of the few ways we can promote muscle recovery while remaining active. Walks are the perfect thing to do between workouts on a rest day while still ensuring you get all your steps in. An added benefit? Long walks provide enough endorphin release to lift your mood and support your daily mental health. I like to pair my walks with a favorite podcast or a phone call to an old friend!

Seven: Foam Rolling

I don’t know about you, but foam rolling has always had a very cool mystique to me. Whenever someone was foam rolling, it was because they had worked hard enough to “need to.” It’s a silly thought, born from being a young dancer because foam rolling benefits anyone who uses their body as much as we do. Foam rolling allows us to break down fascia buildup, relax tight muscles, and increase circulation.

Do any of those benefits sound bad? Exactly. You want to roll as slowly as possible to get the most out of your foam rolling session. This gives your muscles time to relax. It should feel like it “hurts so good.” If it’s too intense, try a softer-grade foam roller or a different type of stretching. There are many different types of foam rollers for different types of exercise, muscles, and stretches. So, feel free to shop around until you find something that will suit your precise needs.


Eight: Be In Nature

Spending time in the sunshine and fresh air can be a huge stress reliever and mood booster–ESPECIALLY if you have spent long hours indoors in a studio or dark theatre. Like plants, our bodies need sunshine to create certain vitamins. One such vitamin is vitamin D! While we can get this vitamin into our system through different foods, our body produces it naturally when we are exposed to sunlight! Vitamin D helps with our absorption of calcium and phosphorus, which help our immune system and bone development. There have also been studies that suggest vitamin D can help regulate our moods and decrease our risk of depression.

So, what will you be trying out this week? Do you already have a favorite? Let us know @dancerswholift on Instagram or TikTok. We’d love to see how you actively support recovery to optimize performance. In the meantime, try adding one of these things to what I am sure is an already packed schedule. Give it a few weeks and see how you feel. I think you’ll be surprised how a couple of tiny changes can make a big difference.


Direct message us on Instagram or TikTok. Or tag us in a post to let us know how do you recover?

xox Am 

PS if you want to work with a pro-dancer/ certified personal trainer who can make tailored training, nutrition, and recovery plans for you, you should check out our 1:1 coaching program, The Embodied Artist Academy